Removing the cover of a Honeywell thermostat is straightforward. You can do it with minimal tools and effort.
In this guide, you will learn the simple steps to safely take off the cover. Thermostats are essential for managing your home’s temperature. Sometimes, you need to access the inside to change batteries or troubleshoot. Knowing how to remove the cover properly ensures you don’t damage the unit.
It also keeps you safe while handling electrical components. Whether you are a homeowner or a renter, this skill is handy. With the right approach, you can maintain your thermostat’s efficiency. Let’s explore the easy steps to remove the cover of your Honeywell thermostat.
Credit: www.reddit.com
Tools Needed
To successfully remove the cover of a Honeywell thermostat, you will need a few tools. Some are essential, while others are optional but helpful. Using the right tools ensures the process is smooth and safe.
Essential Tools
The first essential tool is a flathead screwdriver. This tool helps to pry open the cover gently without causing damage. Another vital tool is a small Phillips screwdriver. You will need this to unscrew any screws holding the cover in place. A flashlight can also be essential. It helps you see inside the thermostat if it is in a dimly lit area.
Optional Tools
Optional tools can make the job easier. A pair of needle-nose pliers can be helpful to handle small wires or parts. A soft cloth or microfiber cloth is also useful. It helps clean any dust or debris from the thermostat. Another optional tool is a small container. Use it to hold any screws or small parts you remove. This way, you won’t lose them.
Safety Precautions
Before removing the cover of a Honeywell thermostat, it’s vital to follow safety precautions. This ensures that you avoid any risks or damage. Below are some essential steps to ensure your safety.
Turn Off Power
First, turn off the power to your thermostat. Locate your home’s circuit breaker panel. Find the switch connected to your thermostat. Turn this switch off. This step prevents any electric shock or short circuits.
Use Protective Gear
Next, use protective gear. Wear gloves to protect your hands. Use safety glasses to shield your eyes. This gear protects you from any unforeseen accidents or debris.
Identify Thermostat Model
Before removing the cover of your Honeywell thermostat, you need to know its model. Different models have different covers and methods to remove them. Identifying the model ensures you do it correctly without damage.
Locate Model Number
The first step is to find the model number. Look at the front of the thermostat. Sometimes, the model number is printed on the display or the trim. If not, you might need to remove the thermostat from the wall. Check the back or the sides for the model number. This number is crucial for the next steps.
Check User Manual
Once you have the model number, the next step is to check the user manual. The manual provides detailed instructions on how to remove the cover. If you don’t have the physical manual, you can find it online. Search for the manual using the model number. The manual often has diagrams to help you understand the process better.
Initial Inspection
Removing the cover of a Honeywell thermostat starts with an initial inspection. This step ensures you do not damage the device. Look at the thermostat closely. Identify how the cover is attached. Different models may use screws or clips.
Check For Screws
First, check if there are any visible screws. Look around the edges of the thermostat. Some models have screws at the bottom or sides. Use a suitable screwdriver to remove them. Keep the screws in a safe place. You will need them to reattach the cover.
Inspect For Clips
If there are no screws, look for clips. Clips are usually hidden. Gently feel around the edges of the thermostat. Use your fingers to find any clips holding the cover. Apply gentle pressure to release the clips. Be careful not to break them.
Removing Screws
Removing the cover of a Honeywell thermostat can seem daunting. One of the crucial steps in this process is removing screws. This step is important to ensure you don’t damage the device. Let’s dive into the details.
Locate Screws
First, you need to locate the screws on your Honeywell thermostat. These screws are usually found at the bottom or sides of the device. Refer to the device’s manual if you have trouble finding them.
Unscrew Carefully
Once the screws are located, the next step is to unscrew carefully. Use a suitable screwdriver that fits the screw heads. Turn the screwdriver counterclockwise to loosen the screws. Avoid applying too much force to prevent stripping the screws.
Place the screws in a safe place to avoid losing them. Once all screws are removed, gently lift the cover off the thermostat.
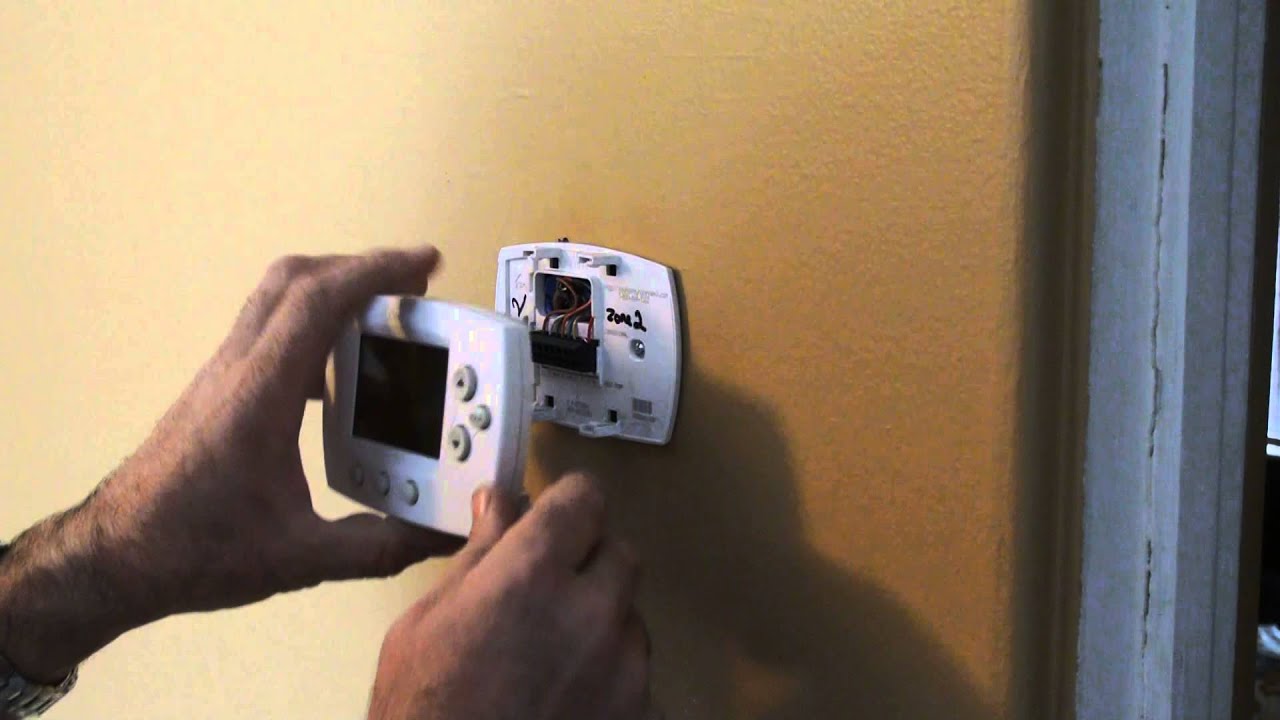
Credit: www.youtube.com
Detaching Clips
Removing the cover of a Honeywell thermostat can seem tricky. One important step is detaching the clips. These clips hold the cover securely. Follow the steps below to detach them safely.
Locate Clips
First, locate the clips on your Honeywell thermostat. These clips are small and usually on the sides or bottom. Carefully inspect your thermostat to find them.
Use Flathead Screwdriver
Next, take a flathead screwdriver. Insert it gently under the clip. Apply a bit of pressure. The clip should start to lift. Do this for each clip. Be gentle to avoid damage.
Removing The Cover
Removing the cover of a Honeywell thermostat is a simple process. It allows you to access the internal components. Follow these steps to ensure you do it safely and correctly.
Gently Pry Open
Start by turning off the power to your thermostat. This will ensure your safety. Locate the seam where the cover meets the base. Use a flathead screwdriver or your fingers to gently pry it open. Be careful not to use excessive force. The cover should start to come away from the base.
Lift Off Cover
Once the cover is loose, hold it with both hands. Lift it straight off the base. Ensure you do this slowly and gently. This prevents any internal components from getting damaged. Set the cover aside in a safe place.
Following these steps ensures you remove the cover without any issues. Always handle the thermostat components with care.
Post-removal Steps
After successfully removing the cover of your Honeywell thermostat, it is important to follow a few key steps. These actions ensure the thermostat continues to function effectively. Below, we will guide you through the post-removal steps.
Inspect Internal Components
First, inspect the internal components of the thermostat. Check for any visible damage. Look for loose wires or connections. Ensure that all parts are intact and in their proper place. If you notice any issues, you may need to replace the damaged parts. This inspection helps maintain the thermostat’s performance.
Clean Cover
Next, clean the thermostat cover. Dust and dirt can accumulate over time. Use a soft, dry cloth to wipe the cover. For stubborn dirt, dampen the cloth slightly. Avoid using harsh chemicals. They can damage the cover’s material. Regular cleaning helps keep your thermostat in good condition. It also improves its appearance and functionality.

Credit: willplumb.com
Frequently Asked Questions
How Do I Safely Remove The Cover Of A Honeywell Thermostat?
Turn off power. Gently pull the cover from the base. Avoid force.
Why Won’t My Honeywell Thermostat Cover Come Off?
Check for hidden screws or clips. Use a flashlight to see better.
What Tools Do I Need To Remove A Honeywell Thermostat Cover?
Usually, no tools are needed. Sometimes, a small screwdriver helps.
Can I Damage My Thermostat By Removing The Cover?
Yes, if not careful. Gently pull to avoid breaking wires or clips.
Is It Necessary To Turn Off Power Before Removing The Cover?
Yes, always turn off power. This prevents electric shock or damage.
Conclusion
Removing the cover of a Honeywell thermostat is simple. Follow the steps carefully. Start by turning off the power. Gently pull or slide the cover off. If stuck, use a flat tool to pry it. Clean the cover and thermostat for better performance.
Put the cover back once finished. Always handle your thermostat with care. This ensures it works well and lasts longer. Enjoy a comfortable and well-maintained home.