Moving a thermostat might seem tricky. But with the right steps, you can do it.
A thermostat controls your home’s temperature, keeping it comfortable. Sometimes, moving the thermostat can improve efficiency or aesthetics. Maybe it’s in a bad spot, or you’re remodeling. Whatever the reason, relocating it can be straightforward. The process involves planning, safety checks, and some basic tools.
It’s important to ensure the new location suits the thermostat’s needs. This guide will help you through the steps, ensuring your home remains cozy and energy-efficient. Whether you’re a DIY enthusiast or a beginner, you’ll find this task manageable. Ready to get started? Let’s dive into the details of moving your thermostat safely and effectively.
Credit: www.hunker.com
Tools And Materials Needed
Moving a thermostat requires the right tools and materials. Having everything ready before you start ensures a smooth process. Here, we outline the essentials you need.
Essential Tools
Start with a screwdriver. It helps remove the thermostat cover and wall plate. A drill is necessary for new holes. Use a level to ensure the thermostat is straight. A wire stripper will help with wires. Keep a flashlight handy for better visibility.
Required Materials
You’ll need a new thermostat wall plate if the old one doesn’t fit. Have screws and wall anchors ready. Get some electrical tape for securing wires. A pencil is useful for marking new holes. Ensure you have wire nuts for connecting wires.
Safety Precautions
Moving a thermostat is a straightforward task, but safety is crucial. Always follow the recommended safety precautions to avoid accidents and injuries. Here are the essential steps to ensure your safety while moving a thermostat.
Turn Off Power
Before starting, always turn off the power to your HVAC system. This step is vital to prevent electric shocks. Locate the circuit breaker panel in your home. Switch off the breaker that supplies power to the thermostat.
Double-check that the power is off by trying to adjust the temperature on the thermostat. If the display is off, the power is successfully turned off. Never skip this step as it ensures your safety.
Safety Gear
Wearing proper safety gear is essential. Use the following items:
- Insulated gloves to protect your hands from electric shocks.
- Safety goggles to protect your eyes from dust and debris.
- Dust mask to avoid inhaling dust particles.
Ensure you have these items ready before starting the task. They will provide an added layer of protection and make the job safer.
By following these safety precautions, you can move your thermostat safely and efficiently. Always prioritize safety to avoid potential hazards.
Choosing The New Location
Choosing the new location for your thermostat is crucial. Proper placement ensures accurate temperature readings. This leads to better energy efficiency and comfort. Let’s explore ideal spots and areas to avoid.
Ideal Placement
Place the thermostat in a central location. This allows it to get an average temperature reading of your home. Install it on an interior wall, away from direct sunlight. Keep it at eye level, about 52 to 60 inches from the floor. This makes it easy to read and adjust. Make sure there’s good airflow around it. This prevents false readings.
Avoid Problem Areas
Do not place the thermostat near windows or doors. These areas experience drafts and temperature fluctuations. Avoid placing it near air vents or radiators. These can cause inaccurate readings. Keep it away from kitchens and bathrooms. These rooms have varying temperatures due to cooking and showers. Avoid placing it in hallways. They often have different temperatures from the main living areas. Do not place it near electronics that produce heat. This can lead to false readings.
Removing The Old Thermostat
Removing the old thermostat is the first step in moving it to a new location. This process requires careful attention to detail. Follow these steps to ensure you do it safely and correctly.
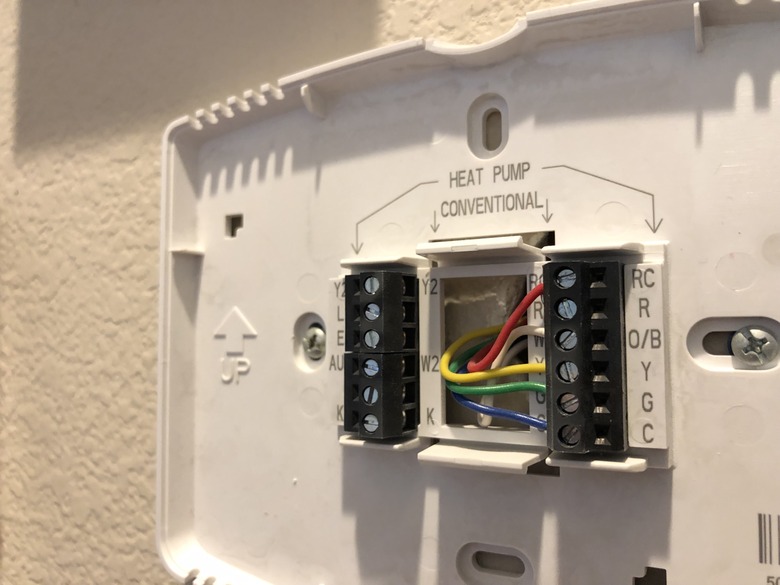
Disconnect Wiring
First, turn off the power to the thermostat. This can be done at the circuit breaker. Safety first. Next, remove the cover of the thermostat. You will see several wires connected to terminals. Take a photo or note the wire colors and their corresponding terminals. This will help when reconnecting the new thermostat. Carefully disconnect each wire, ensuring they do not fall back into the wall.
Detach From Wall
Once the wires are disconnected, it’s time to detach the thermostat from the wall. Most thermostats are secured with screws. Use a screwdriver to remove these screws. Gently pull the thermostat away from the wall. If it sticks, use a putty knife to help ease it off. Be careful not to damage the wall or the wires.
Preparing The New Location
Before moving your thermostat, it’s important to prepare the new location properly. Selecting the right spot ensures the thermostat works efficiently. This involves marking the spot and drilling holes accurately.
Marking The Spot
First, choose a location where the thermostat can measure the home’s average temperature. Avoid placing it near windows, doors, or direct sunlight. These spots can give false readings.
Use a level to ensure your thermostat will be straight. Hold the backplate of the thermostat against the wall. Mark the screw holes with a pencil.
Drilling Holes
Once the spot is marked, it’s time to drill holes. Use a drill bit that matches the size of the screws provided. Drill carefully to avoid damaging any electrical wires inside the wall.
Insert wall anchors if necessary. These will help keep the thermostat secure. Make sure the holes are clean and free of debris. This ensures a snug fit for your screws.
Now, your new location is ready for the next steps. This preparation ensures your thermostat will work efficiently in its new spot.
Installing The Thermostat
Installing a thermostat can seem like a daunting task. With the right tools and steps, it can be easy. This guide will help you install your thermostat correctly and efficiently. Let’s dive into the details.
Mounting The Base
First, turn off the power to your HVAC system. This is a crucial safety step. Locate the spot where you want to install the thermostat. Use a level to ensure it will be straight. Mark the holes for the screws with a pencil.
Next, drill holes where you made the marks. Insert wall anchors if needed. Screw the base plate to the wall. Make sure it is secure and level. This will ensure the thermostat functions properly.
Connecting Wires
Now, let’s connect the wires. Pull the wires through the hole in the base plate. Follow the wiring diagram provided with your thermostat. Each wire should match the corresponding terminal.
Loosen the screws on the terminals. Insert the wires into their respective terminals. Tighten the screws to secure the wires. Ensure the wires are firmly connected and not loose.
Double-check your connections. Make sure each wire is in the correct terminal. This step is crucial for the thermostat to work correctly. After connecting the wires, attach the thermostat to the base plate.
Turn the power back on to your HVAC system. Test your new thermostat to ensure it works. Follow the manufacturer’s instructions to configure the settings. Enjoy your new, properly installed thermostat.
Testing The New Thermostat
Once you’ve installed your new thermostat, it’s essential to test it. This ensures everything works as expected. Here’s a step-by-step guide to help you out.
Powering On
First, turn the power back on. Go to your circuit breaker and switch it on. Watch the thermostat’s display. It should light up. If it doesn’t, check your connections.
Checking Functionality
Now, test the basic functions. Set the thermostat to heat. Raise the temperature. Wait for the furnace to start. It should kick in after a few moments. Next, set it to cool. Lower the temperature. The air conditioner should start running. Listen for the fan. Feel the air from vents. Ensure it’s cool.
Finally, check any extra features. Some thermostats have Wi-Fi. Connect it to your network. Verify it’s working through the app. Ensure all settings are responsive. Your new thermostat should now be fully operational.

Credit: www.youtube.com
Troubleshooting Common Issues
Moving a thermostat can sometimes lead to unexpected issues. Troubleshooting common problems helps ensure your thermostat works correctly. Below are solutions to frequent issues you might face.
No Power
If your thermostat has no power, check the power source. Ensure the circuit breaker is on. You may have blown a fuse. Here’s a simple checklist to follow:
- Check the circuit breaker.
- Inspect the fuse for damage.
- Ensure all wires are connected firmly.
- Examine the batteries if your thermostat uses them.
Still no power? Call a professional to inspect the wiring. Safety first!
Incorrect Readings
Incorrect temperature readings can be frustrating. They can result in discomfort. Here are common causes:
| Issue | Solution |
|---|---|
| Thermostat placed in direct sunlight | Move it to a shaded area |
| Located near a heat source | Relocate to a neutral spot |
| Dirty sensor | Clean the sensor gently with a soft brush |
To ensure accurate readings, place the thermostat in a central location. Avoid areas with drafts or heat sources. This will give the most accurate temperature.

Credit: www.reddit.com
Frequently Asked Questions
How Do You Move A Thermostat?
First, turn off the power. Then, remove the thermostat cover. Disconnect wires. Mount it in the new location.
What Tools Are Needed To Move A Thermostat?
You’ll need a screwdriver, drill, wire strippers, and a level. These tools help with disconnection and installation.
Can I Move A Thermostat Myself?
Yes, you can. Follow step-by-step instructions carefully. Make sure to turn off the power first.
Is It Expensive To Move A Thermostat?
Costs vary. DIY is cheaper. Hiring a professional can cost more due to labor charges.
Why Should I Move My Thermostat?
Better temperature control. Avoids direct sunlight or drafts. Helps the heating and cooling system work efficiently.
Conclusion
Moving a thermostat doesn’t have to be complicated. Follow the steps carefully. Gather the necessary tools beforehand. Always turn off the power first. Label wires to avoid confusion. Keep safety in mind throughout the process. Test the thermostat after reinstallation.
Ensure it works correctly. If unsure, consult a professional for help. Moving a thermostat can improve home comfort. With these tips, you can do it efficiently. Enjoy your newly positioned thermostat!