Have you ever found yourself staring at a half-finished tiling project, wishing you knew how to mix just the right amount of grout without wasting any? You’re not alone.
Mixing grout in small amounts can feel like a daunting task, especially when most instructions are geared towards larger batches. But what if I told you that mastering this skill could save you time, money, and frustration? Imagine completing your tiling project with precision, knowing you’ve mixed just enough grout to get the job done without any waste.
By learning the art of mixing small amounts of grout, you not only avoid unnecessary mess but also ensure that your tiles are perfectly set. Ready to discover how you can achieve professional results with ease? Let’s dive into the details and transform your DIY experience.
Choosing The Right Grout Type
Choosing the right grout type is crucial when mixing small amounts for your project. The right grout ensures durability and aesthetic appeal. It’s not just about picking a color; you need to consider the material and location too.
Understanding Grout Types
Grout is more than just a filler. It comes in various types like sanded, unsanded, epoxy, and furan. Sanded grout is great for larger joints, while unsanded works for smaller gaps. Epoxy grout is known for its water resistance, making it perfect for bathrooms.
Matching Grout To Tile
Your tiles play a vital role in choosing grout. Ceramic tiles often pair with sanded grout. Marble and glass tiles need unsanded grout to avoid scratches. Think about how grout color will complement or contrast with your tiles.
Location Matters
Where you’re applying grout impacts your choice. Kitchens and bathrooms require water-resistant grout. Outdoor spaces need grout that withstands weather changes. Consider the environment before settling on a grout type.
Consider The Application Process
Some grout types are easier to apply than others. Epoxy grout requires precision and quick application. Sanded grout is forgiving and allows for more flexibility. Think about your comfort level with the application process.
Have you ever chosen the wrong grout type, only to regret it later? The right choice can save you time and frustration. Selecting the right grout is an art that combines practicality with aesthetics. Make your choice wisely, and your tiles will thank you for it!
Essential Tools And Materials
Mixing grout properly requires specific tools and materials. Using the right items ensures the grout is smooth and consistent. A small batch of grout needs only a few essential tools. Here, we’ll discuss what you need to get started.
Mixing Container
A small plastic bucket works well. Ensure it’s clean and dry before use. It should have enough space to hold the grout mix.
Grout Float
A rubber grout float helps apply grout evenly. This tool spreads grout across tiles, filling gaps smoothly.
Measuring Cup
Accurate measuring is crucial. A measuring cup helps get the right water-to-grout ratio. Make sure it’s precise.
Mixing Tool
A small trowel or stick is useful. These tools mix grout without clumping. Stir until the consistency is smooth.
Safety Gear
Protective gloves and goggles are necessary. They keep your hands and eyes safe. Grout can irritate skin and eyes.
Clean Water
Use clean water for mixing. Dirty water affects grout quality. Fresh water ensures a strong bond.
Preparing Your Workspace
Create an efficient workspace before mixing small amounts of grout. Gather essential tools, like a mixing bowl and trowel. Ensure the area is clean and well-lit to prevent errors.
Preparing your workspace is an essential step when you’re about to mix a small amount of grout. This process not only sets the tone for an efficient workflow but also ensures that you achieve the best results. A well-organized space minimizes mess and maximizes your focus on the task at hand.Creating an effective workspace might sound simple, but there are nuances that can make or break your project. I’ve learned this firsthand when I once mixed grout on a cluttered table and ended up with a mess that took longer to clean than the actual mixing. Let’s dive into some practical steps to prepare your workspace effectively.Clear The Area
Start by removing any unnecessary items from your workspace. A clutter-free area is not only visually appealing but also reduces the risk of accidents. Imagine reaching for the grout mix and accidentally knocking over a cup of coffee—what a mess!Gather Your Tools
Before you begin, ensure all your tools are within arm’s reach. This includes the grout mix, a bucket, mixing stick, water, and a clean cloth. Having everything you need at hand saves time and keeps your momentum going.Protect Surfaces
Cover your work surfaces with newspaper or a plastic sheet. Grout can be stubborn if it gets onto surfaces you didn’t intend to grout. A simple protective layer can save you from hours of scrubbing later on.Ensure Proper Lighting
Good lighting is crucial. It helps you see the consistency of the grout mix clearly. If natural light is insufficient, consider using a bright lamp to illuminate your workspace.Ventilation Matters
Adequate ventilation is often overlooked but vital. Mixing grout can release dust and odors. Open a window or use a fan to keep fresh air circulating in the room.Remember, the effort you put into setting up your workspace can greatly influence the outcome of your project. Have you ever found yourself in a situation where a little preparation could have saved you a lot of hassle? Share your experiences in the comments, and let’s learn from each other!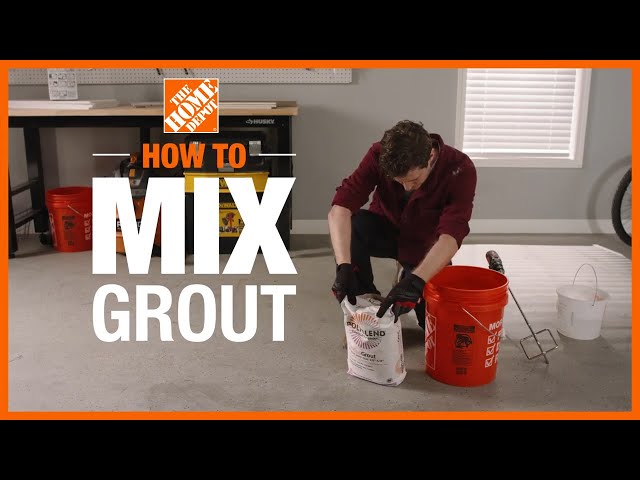
Credit: www.youtube.com
Measuring Grout Components
Measuring grout components precisely ensures a perfect mix. It’s crucial for small projects. Accurate measurements prevent wastage and ensure strong, durable grout. Follow these steps to measure grout components correctly. This guide covers essential tips for a flawless outcome.
Understanding Grout Composition
Grout is made of cement, water, and sand. Each component has its role. Cement binds the mix, giving it strength. Sand adds volume and texture. Water activates the cement, making the mix workable. Knowing these roles helps in measuring accurately.
Tools Needed For Measurement
Using the right tools is important. A measuring cup is essential for liquids. Get a small scale for weighing dry components. Use a mixing container to combine everything. These tools make the process easier and more accurate.
Determining The Right Quantity
Calculate the area you want to grout. Measure the length and width in feet. Multiply to find the square footage. Use this to determine the grout quantity. Always mix a little extra for any adjustments.
Measuring Cement
Measure cement using a scale. Pour it into the mixing container. Make sure the scale is accurate. Keep the amount consistent for every batch.
Measuring Sand
Use the same scale for sand. Sand should be dry for accurate measurement. Add it to the container with cement. Mix them gently before adding water.
Measuring Water
Measure water using a measuring cup. Add slowly to the dry mix. Stir as you add to avoid lumps. Adjust the amount if the mix is too thick.
Final Check
Once mixed, check the consistency. It should be thick but spreadable. Add more water for adjustments. Ensure it holds together without being runny.
Mixing Techniques For Small Batches
Mixing small amounts of grout requires precision. Use a clean bucket and add water gradually to the powder. Stir with a margin trowel until smooth, ensuring no lumps. Adjust the mixture by adding more water or powder to achieve a paste-like consistency perfect for your project.
Mixing grout for small projects can be a straightforward task if approached with the right technique. Whether you’re tackling a small tile repair or a craft project, knowing how to mix small batches of grout effectively will save you time and materials. It’s all about precision and practice, ensuring the mixture is just right for your specific needs. Let’s dive into some practical mixing techniques that will help you achieve perfect consistency every time.Understanding The Importance Of Consistency
The consistency of your grout can make or break your project. It needs to be neither too thick nor too runny. A peanut butter-like texture often works best for small applications. This balance ensures easy application and strong adhesion.Gathering The Right Tools
Having the right tools is crucial for mixing grout. You will need a clean bucket, a mixing paddle or stick, and a measuring cup. If you’re mixing by hand, a sturdy spoon can work just as well. Choose tools that are easy to clean and won’t introduce contaminants into your grout.Measuring Ingredients Accurately
Precision in measurement is key when mixing grout. Use a measuring cup to add the grout powder to your bucket. Start with a small amount, as you can always add more if needed. Gradually add water, mixing continuously, to achieve the desired consistency.Mixing Techniques
Begin by adding a small amount of water to the grout powder. Stir slowly to avoid creating air bubbles. If the mixture seems too dry, add water in small increments. Keep mixing until the grout is smooth and lump-free.Testing The Mixture
Before applying, test the grout’s consistency. Scoop a small amount onto your mixing tool and let it sit. If it holds its shape without dripping, it’s ready. If not, adjust by adding either more water or grout powder accordingly.Allowing For Slake Time
Once mixed, let the grout sit for a few minutes, known as slaking. This allows the chemical reactions to start and ensures better adhesion. Stir the mixture again briefly before application.Mixing small batches of grout is more art than science. With practice, you’ll develop an eye for the right texture and feel. Have you ever encountered challenges while mixing grout? Consider trying these techniques to see if they improve your results.Achieving The Perfect Consistency
Mixing grout in small amounts requires precision to achieve ideal consistency. Combine grout powder with water gradually, stirring until smooth. Aim for a paste-like texture that holds shape without being too thick or runny.
Achieving the perfect consistency when mixing grout is crucial for any tiling project. Whether you’re fixing a small section in your bathroom or laying tiles in the kitchen, the grout’s consistency can make or break the final look. Too thick, and it won’t spread easily; too thin, and it won’t provide the needed support. Let’s dive into how you can get it just right.Understanding The Right Texture
The ideal grout texture should resemble smooth peanut butter. It should be thick enough to stay on your mixing tool without dripping, yet pliable enough to spread effortlessly between tiles. If you’ve ever whipped cream just to the point where it’s thick but still slides off the spoon, that’s the balance you’re aiming for.Tools You’ll Need
Having the right tools is half the battle. You’ll need a mixing container, a small trowel or mixing paddle, and a measuring cup. A clean bucket works great for mixing small amounts. A spatula from your kitchen can be a handy makeshift tool if you’re in a pinch.Step-by-step Mixing Process
Start by adding a small amount of grout powder to your mixing container. Gradually add water, a little at a time, while stirring. This helps prevent lumps. Stir continuously until the grout reaches that perfect consistency.Troubleshooting Common Mistakes
If your grout ends up too thick, don’t panic. Simply add a tablespoon of water and mix again. If it’s too runny, sprinkle in a little more grout powder. Adjusting incrementally helps maintain control over the consistency.Personal Experience: Lessons Learned
During my first tiling project, I underestimated the importance of consistency. My grout was too runny, leading to a messy application and weak joints. After adjusting the mix, the difference was clear. The grout spread smoothly and set much stronger.Testing Consistency Before Application
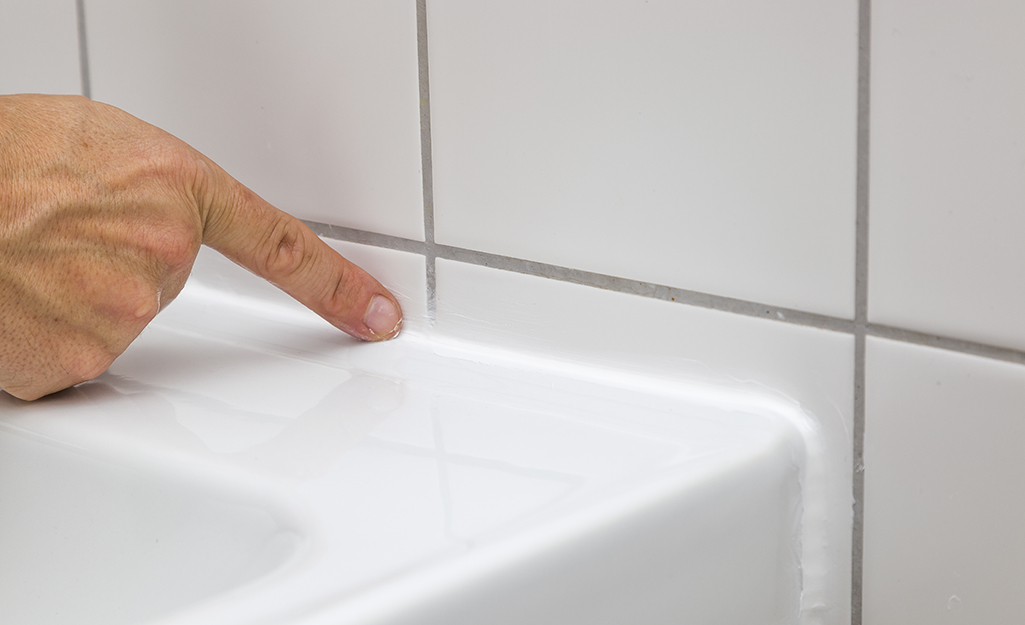
Before applying your grout, do a quick test. Spread a small amount on a piece of cardboard. If it holds its shape without spreading, you’re good to go. This quick step can save you time and effort down the line.Why Consistency Matters
Consistency impacts both the aesthetics and durability of your tiling job. Properly mixed grout adheres better, ensuring tiles stay in place for years. Wouldn’t you want your hard work to stand the test of time?Achieving the perfect consistency might seem daunting at first, but with practice and patience, it becomes second nature. Next time you mix grout, remember these tips and enjoy the satisfaction of a job well done.Common Mistakes To Avoid
Mixing grout might seem simple, but mistakes can happen easily. Avoiding these errors ensures a smooth, durable finish. Below, we explore common mistakes people make. Learn how to steer clear of these pitfalls.
1. Overestimating The Amount Needed
Many overestimate the grout needed for small jobs. This leads to waste and mess. Measure the area carefully to determine the right amount. Use a small batch to avoid excess grout.
2. Incorrect Water Ratio
Adding too much water makes grout weak and runny. Too little water makes it dry and crumbly. Follow the manufacturer’s instructions for the proper water ratio. Mix until you reach a peanut butter consistency.
3. Mixing Too Quickly
Mixing grout too fast introduces air bubbles. These bubbles weaken the grout. Stir slowly and steadily for a smooth, bubble-free mix. Let the grout sit for a few minutes to settle.
4. Not Cleaning The Mixing Tools
Dirty tools affect grout consistency and color. Clean tools before and after use. Remove old grout and debris for a smooth mix. This ensures even color and texture.
5. Ignoring Pot Life
Grout has a limited working time, known as pot life. Use it within this time, or it will harden. Prepare only what you can use promptly. This avoids waste and ensures proper application.
6. Not Testing A Small Area First
Always test grout on a small area first. This checks for color match and consistency. A small test prevents large-scale issues. Adjust if needed before applying to the entire area.
Avoid these common mistakes for a successful grout mix. Proper preparation and attention to detail make all the difference.
Credit: www.homedepot.com
Cleaning Up After Mixing
Mixing grout can be a messy task. Once you’ve achieved the perfect mix, cleaning up is crucial. It prevents stains and keeps your workspace tidy. Proper cleanup also extends the life of your tools.
Understanding how to efficiently clean after mixing makes future projects easier. It ensures your workspace remains organized.
Dispose Of Excess Grout
Dispose of any leftover grout promptly. This prevents hardening in your mixing container. Use a spatula to scrape out excess grout into a waste bin.
Do not pour grout down the drain. It can cause blockages and plumbing issues. Proper disposal keeps your home safe.
Rinse Tools Thoroughly
Rinse mixing tools under warm water. This removes grout residue effectively. Scrub with a brush for stubborn spots.
A clean brush ensures tools are ready for next use. Dry them with a towel to prevent rust.
Clean Work Surface
Wipe down the work surface with a damp cloth. This removes any grout splatters or spills. A clean surface prevents grout from hardening.
Use mild detergent if stains persist. Ensure the surface is completely dry before storing tools.
Storage Tips For Unused Grout
Mixing small amounts of grout ensures less waste and easier storage. Use airtight containers to keep unused grout fresh. Store in a cool, dry place to prevent hardening.
Storing unused grout might seem trivial, but it can save you time and money on future projects. Proper storage ensures that your grout remains usable, preventing wastage and the need to purchase new batches unnecessarily. You might be surprised at how a little attention to storage details can make a big difference in preserving the quality of your grout.Organize Your Storage Space
Keeping your storage area tidy is crucial for easy access and maintaining grout quality. Designate a specific spot for your grout, away from fluctuating temperatures or moisture. Use shelves or bins to keep everything organized and within reach.Seal Containers Tightly
Air exposure can ruin your grout. After mixing your grout, store it in airtight containers to prevent hardening. Plastic containers with tight-fitting lids work wonders. Remember to check if the lid is sealed properly before storing.Label Everything
Label your containers with the date and type of grout. This simple step can save you confusion later on. When you need to reuse your grout, knowing its type and freshness can be a game-changer.Keep Away From Extreme Temperatures
Grout reacts poorly to extreme temperatures. Store it in a cool, dry place, away from direct sunlight or freezing conditions. Temperature fluctuations can affect its consistency and usability.Check For Expiry
Unused grout has a shelf life. Periodically check your stored grout for any changes in texture or smell. If it seems off, it’s better to discard it than risk compromising your project.Reuse Wisely
Do you have plans for upcoming projects? Consider using your stored grout creatively. You might find opportunities to touch up small areas or start a new DIY project. Using what you have can be both resourceful and satisfying.Have you ever thought about how much money you might save by storing unused grout correctly? By taking simple steps to ensure proper storage, you can extend its usability, reduce waste, and be ready for your next project.
Credit: www.youtube.com
Frequently Asked Questions
How Do I Mix A Small Amount Of Grout?
Use a clean bucket. Add grout powder first. Slowly mix in water. Stir until smooth consistency.
What Tools Are Needed To Mix Grout?
Use a bucket, mixing paddle, and a drill. These tools help achieve a smooth grout mix.
How Much Water Do I Add To Grout?
Start with a little water. Gradually add more if needed. Aim for a thick, smooth paste.
Can I Mix Grout By Hand?
Yes, but it’s tiring. Use a drill with a mixing paddle for easier mixing.
Why Is Grout Consistency Important?
Proper consistency prevents cracking and ensures strong bonds. Aim for thick but spreadable grout.
Conclusion
Mixing a small amount of grout is simple. Follow the steps for success. Measure the grout carefully. Add water slowly while mixing. Achieve a smooth, lump-free consistency. Use immediately for best results. This ensures strong tile bonding. Practice makes perfect over time.
Don’t rush the process. Patience yields better outcomes. Enjoy your DIY projects with confidence. Grout work enhances your home. Remember, neatness counts. Clean tools promptly to avoid hardening. Happy tiling!